Central Integration
The Central platform is a model management system. Central’s integration with Leapfrog Geo lets you work in different project revisions, publish models to the server, view documents and annotations and reply to annotations.
Projects shared within Central can be downloaded and worked on locally in Leapfrog Geo. When you have finished working on a project, select the objects you wish to publish to Central and add notes about the revision. New projects can be added to Central by building them from scratch or by uploading an existing project.
This topic describes how to set up and work with Central from within Leapfrog Geo. It is divided into:
- Enabling Central
- Setting Up the Connection
- Connecting to Central
- Viewing a Project’s History
- Sharing Projects
- Downloading a Local Copy of a Project
- Publishing to Central
- New Central Projects
- Troubleshooting Connectivity Issues
To learn more about Central, see the Central help.
Enabling Central
To enable Central, open the Settings window by clicking on the Leapfrog Geo menu. Select Central and tick the box to enable Central. A Central Projects tab will appear in the main window.
When you connect to Central, you can download projects and work on them locally. To change the location where projects are saved, click the Change button under Project Files and navigate to where you want to save projects:
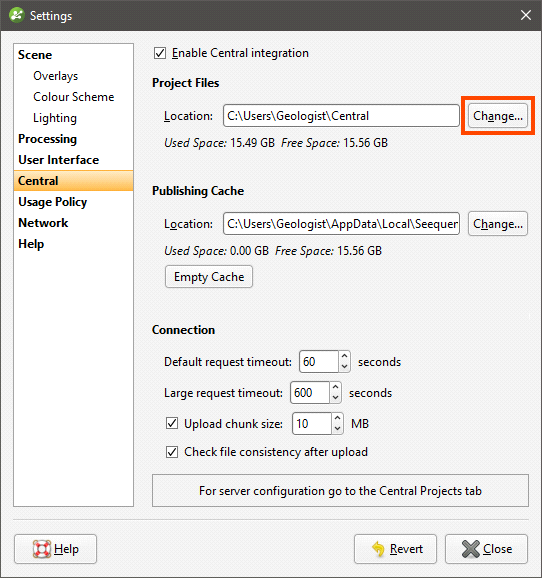
The Publishing Cache settings determine where Central data is stored while publishing to Central. If you have a small local drive and use network storage for most of your data, you can change where temporary publishing data is stored. To do this, click on the Change button and navigate to the required location.
The Empty Cache button clears the publishing cache folder for the connected Central Server. This button is only active when you are connected to a Central server and should only be used if you are having problems publishing to Central.
The Connection settings determine the timeout settings for connection to the Central server. The Large request timeout is used for publishing, uploading attachments and getting a revision. All other communication with the Central server uses the Default request timeout. The Default request timeout and Large request timeout should only be adjusted upward if you have problems with a poor connection. The default values are 60 seconds and 600 seconds.
The Upload chunk size setting is useful if you have a poor connection. It determines the size of the chunks used to upload large files. For example, if the Upload chunk size is 10MB and you are uploading a 100MB file, the file will be uploaded in 10 chunks. If your connection is poor and you are experiencing issues, you can decrease the value of the Upload chunk size.
There is an option for checking the integrity of a revision after it has been uploaded. If you wish to do this, enable the Check file consistency after upload option.
Setting Up the Connection
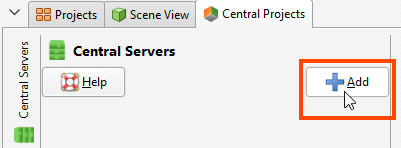
The first time you connect to Central, you will need to set up your connection. Request an account from your Central administrator, who will provide you with your connection details. Once you have these details, click on the Central Projects tab. Click the Add button to add a new server:
Click New user to enter your activation code, then enter the information provided to you by your Central administrator.
The activation code can be used a single time and is for the purposes of setting up your user name and password.
Enter a new password, then accept the terms and conditions and click Save.
Connecting to Central
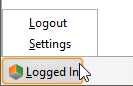
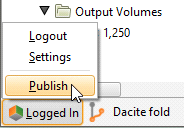
Once Central integration has been enabled, you can see the status of your connection to Central in the lower left-hand corner of the Leapfrog Geo main window. Click this button to logout or change Central settings:
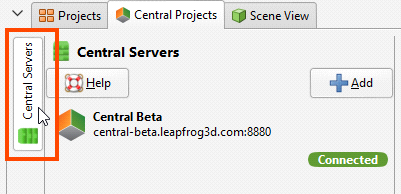
If you are logged out, click on the Central Projects tab and click the server you wish to connect to:
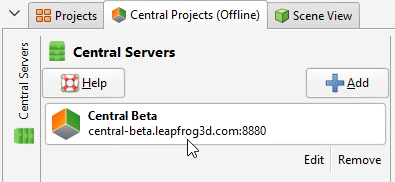
Leapfrog Geo version 4.5 is only compatible with Central Server version 2.2. If you get a message saying that the version of Leapfrog Geo you are using is not compatible with the Central Server you are trying to connect to, follow the instructions in the message, then try connecting again.
To hide the Central Servers panel, click the button:
Viewing a Project’s History
The Central Projects tab shows thumbnails of the projects available in Central. Projects will be organised by location if there are multiple projects at a given location; otherwise projects will simply appear in a list.
A project’s location is set in the Central Portal. You cannot change its location from Leapfrog Geo.
Click on a project to view its history, which will open in a new tab.
Central projects are organised into revisions and branches:
- Different points in the modelling process are captured as revisions, which are specific points in time.
- A revision can be the basis for a new branch, exploring an alternative hypothesis.
These are displayed visually in a project’s history tab, with local copies of projects shown in the panel at the top of the tab:
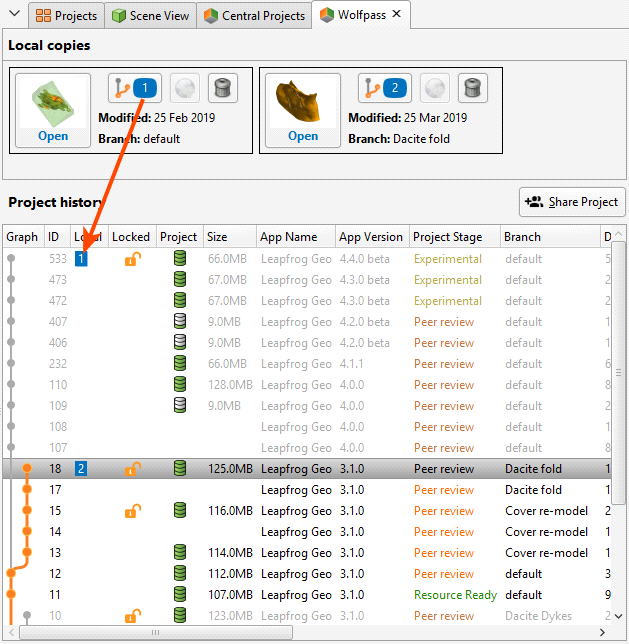
Each local copy is numbered so that it can easily be seen what versions have local copies in the Local column. The number in the column corresponds to the project in the Local copies panel. You can also:
- Click a thumbnail to open a local copy.
- Click the branch/copy number button (
 ) to identify the parent version of the local copy in the project history.
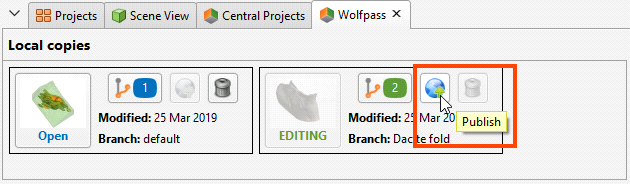
 - Click the Publish button (
 ) to publish the copy being edited to Central.
 - Click the Delete button (
 ) to delete a local copy, if the project is not open.
In the Project history, revisions are displayed chronologically, from the most recent down to the oldest. In the Graph, offshoots from a revision are branches where an alternative hypothesis has been investigated. Changes made in a branch do not appear in other branches; branches effectively diverge from the base revision. The dots on the graph line up with the revision information.
To view more information about a revision, click on it in the history.
Locking Branches
When working on a branch in Leapfrog Geo, the branch can be locked so no other Central users can make changes to it. This is useful for letting others users know that a model is being worked on.
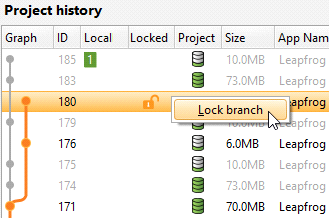
The Locked column indicates whether or not the branch is available to be worked on. If a branch is locked, hold the cursor over it to see who locked it and when it will be available once again.
To lock a branch, right-click on it in the project history and select Lock branch:
In the window that appears, set the Lock duration and add any comments. The lock can be set for as little as one day; when the lock expires or when a new publish is completed, the branch will be unlocked for other users. While the branch is locked, other users are still able to download projects, create new branches and publish to branches that are not locked.
If you locked a branch, you can unlock it before the lock expires by right-clicking on it and selecting Unlock branch:
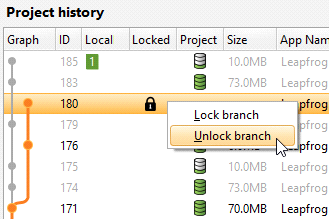
You can also ask your Central administrator to unlock a branch.
Project Included
The Project column indicates whether or not the Leapfrog Geo project was included when the revision was published. If there is no icon displayed, then no project was uploaded when the revision was published. You can view the revision in the Central Browser, but you cannot work on it in Leapfrog Geo.
When Leapfrog Geo projects are included in a revision, they can be published in a Complete state (![]() ) or in an Unprocessed state (
) or in an Unprocessed state (![]() ). The difference between the two is whether or not stored modelling calculations are included in the published project. Removing stored modelling calculations can make the upload/download size of a revision considerably smaller and is useful when internet connectivity is poor. The tradeoff is that when the project is downloaded by a Leapfrog Geo user, the project will have to be reprocessed before they can use it. This may take some time.
). The difference between the two is whether or not stored modelling calculations are included in the published project. Removing stored modelling calculations can make the upload/download size of a revision considerably smaller and is useful when internet connectivity is poor. The tradeoff is that when the project is downloaded by a Leapfrog Geo user, the project will have to be reprocessed before they can use it. This may take some time.
Project Stages
The Project Stage is useful for promoting projects through an organisation’s procedures. For example, your organisation may have project stages defined that include “Experimental”, “Ready for Peer Review” and “Ready for Production”. Different stages are displayed in different colours so it is easy to see at a glance what revisions belong to each stage.
Annotations and Attachments
With Annotations, Central Browser and Leapfrog Geo users can carry out conversations about specific aspects of the model. Annotations include a scene. If you already have the project open in Leapfrog Geo, you can load any scene from that project’s history by clicking on it. Information about the selected scene will be displayed and you will be prompted to load all the objects or only the unchanged objects:
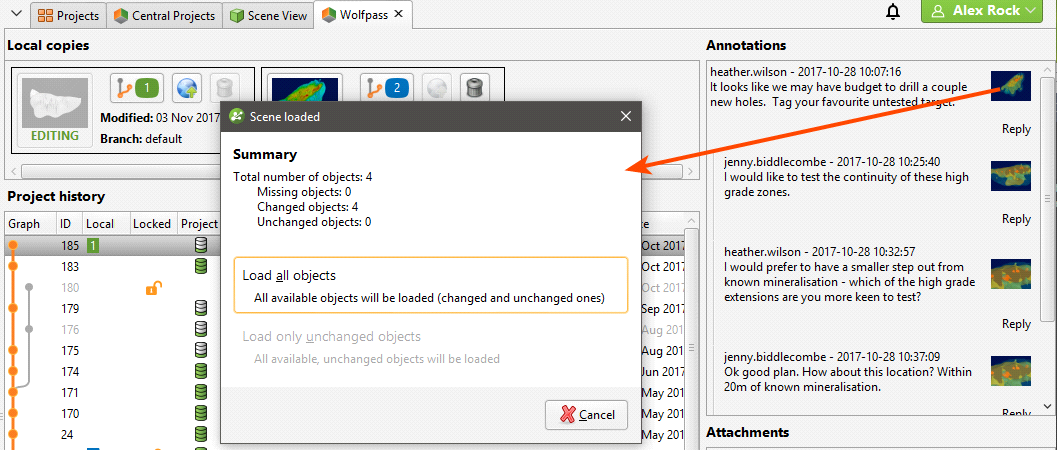
If the selected scene has a geotag, it will be added to the shape list and displayed in the scene.
Central Browser users can also attach files, which can be downloaded in Leapfrog Geo.
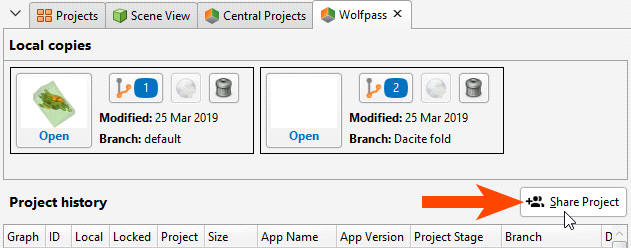
Sharing Projects
If you are a project’s owner, you can share it with other Central users by clicking the Share Project button in the project’s history tab:
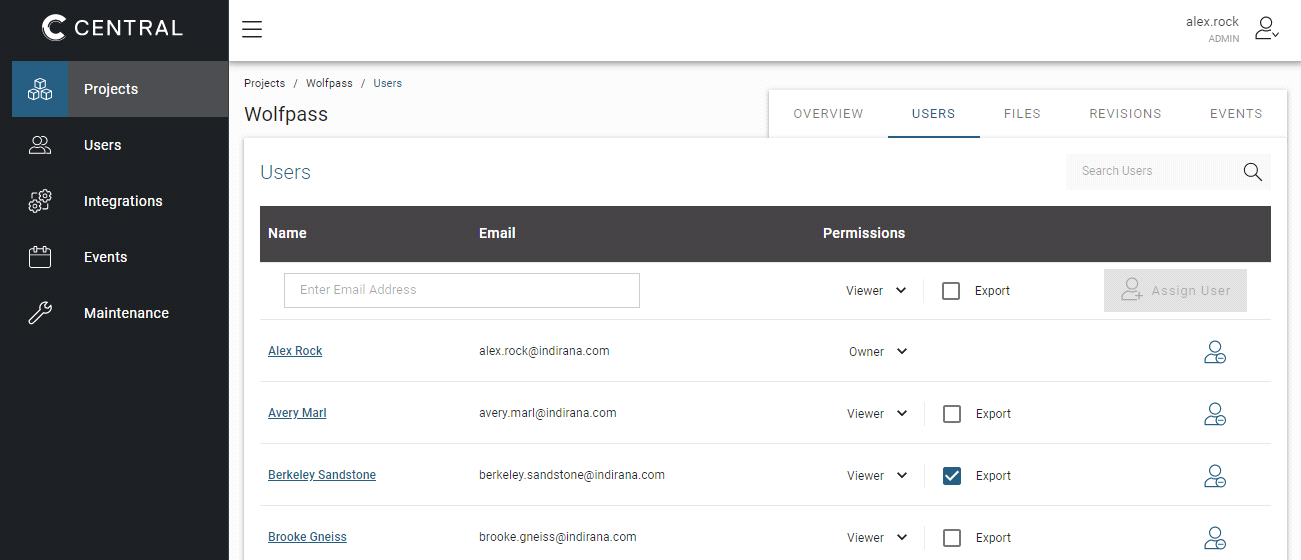
Clicking Share Project opens the Central Portal, displaying the list of users for that project:
You may need to sign in to the Portal.
You can select from the other users in the system or enter a user’s email address, then assign their permissions.
There are four levels of project permissions in Central: Owner, Editor, Viewer+Export and Viewer.
An Owner can:
- Assign other users as the owner. A project can have more than one owner.
- Configure and add an integration to a project they own.
A user who uploads a new project to Central is automatically assigned as the project owner.
Editor access allows a user to work in a project in Leapfrog.
Viewer+Export access allows a user to open a project in the Central Browser and export data from the project.
Viewer access allows a user to open a project in the Central Browser and make annotations. They cannot export data from the project.
Downloading a Local Copy of a Project
Select a revision and then click Download to download a local copy of the project. The project will be downloaded to the location on your local drive specified in the Settings > Central window. A new revision of the project will be created in the history, as an unpublished project.
Click the Open button in the Local copies panel to open the project:
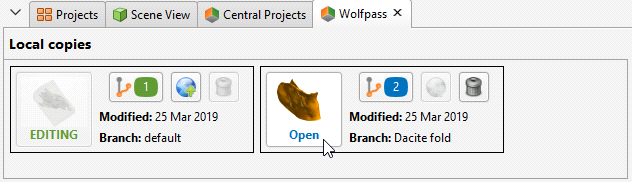
Work in the project as you would any other Leapfrog Geo project.
Publishing to Central
When you are ready to submit your project to Central, you can start the publishing process by clicking on the Central button in the lower left-hand corner of the screen and selecting Publish:
You can also select the Publish button (![]() ) in the Local copies panel:
) in the Local copies panel:
The steps in publishing a project to Central are:
- Unfinished Publish Events
- Selecting Objects
- Setting the Project Workflow Stage
- Including the Project
- Adding Revision Information
- Preparing the Package
- Uploading the Package
Unfinished Publish Events
When you click Publish, you may receive a message saying there is an unfinished publish event:
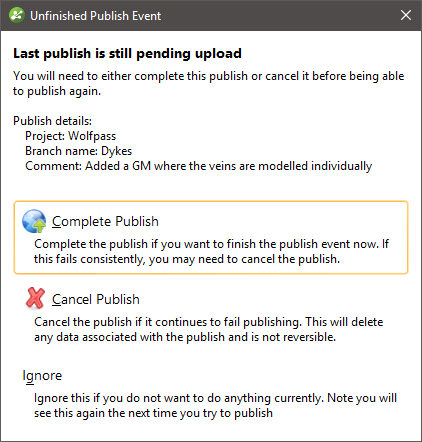
This occurs when a previous publish event was interrupted. Choose from the options presented.
If the publish event was abandoned, it can be removed via the Central Portal.
Selecting Objects
Select the objects you wish to publish from those available in the project:
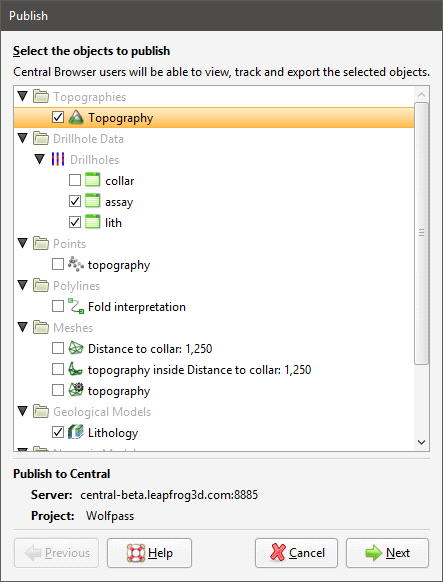
Although sub-blocked models can be published to Central, the dip will not be included.
Click Next to choose options for how the project will be uploaded.
Setting the Project Workflow Stage
Project stages are useful for advancing projects through an organisation’s processes. If the project is ready to be moved on to a different stage, select a different Project Workflow Stage from the list.
Project stages can later be changed in the Central Browser.
Including the Project
Select whether or not to include the Leapfrog Geo project. There are three options:
- No. The Leapfrog Geo project will not be published. Other Central users will not be able to download the project and work on it in Leapfrog Geo. They will, however, be able to review the published objects and their history in the Central Browser.
- Complete.This option publishes the complete Leapfrog Geo project, including stored modelling calculations. Other Central users will be able to download the project and work on it in Leapfrog Geo without reprocessing the project.
- Unprocessed. An unprocessed project has a smaller upload/download size because stored modelling calculations are removed. When an unprocessed project is downloaded again, all of the modelling calculations will need to be reprocessed from the underlying data. Other Central users will be able to download the project and work on it in Leapfrog Geo. Depending on the size of the project, reprocessing may take some time.
Click Next.
Adding Revision Information
Enter information about the new revision. If you want to create a new branch, click the New Branch button and enter a name for the branch.
Once you branch from a timeline, you cannot merge back into it. There’s no reason, however, that you can’t keep working in a branch and start considering that the main branch, if that’s the conclusion you and your team reach.
Preparing the Package
Click Next to begin the processes of packaging the project for publication.
Uploading the Package
Once the project has been packaged, there are two options for starting the upload:
- If you want the upload to begin automatically once the package has been prepared, tick the Auto upload box.
- If you want the option to cancel the upload once it has been packaged, leave the Auto upload box unticked. Once the project has been packaged, click Publish to upload the project to Central.
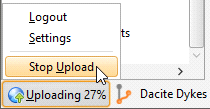
If for some reason you need to stop the upload, click on the Central button in the lower left-hand corner of the screen and select Stop Upload:
You can resume the upload by clicking Publish in the project history. You will be prompted to resume the unfinished publish event, as described in Unfinished Publish Events above.
If the upload is interrupted because the connection to the server is lost, you will be prompted to finish the publish event the next time you log in to Central.
If you exit Leapfrog Geo while a publish event is in progress, you will be warned that a publish event is in progress. You can:
- Cancel exiting Leapfrog Geo, in which case the publish event will continue.
- Confirm that you wish to exit Leapfrog Geo. The next time you connect to this Central server or publish from this project or from another project on the same server, you will be prompted to the resume the interrupted publish event. You can complete the interrupted publish event, if you wish, or ignore it.
New Central Projects
There are two options for putting a project into Central:
- Create a new Central project.
- Put an existing project into Central.
Creating a New Central Project
Use this option to create a new Leapfrog Geo project and put it into Central. In the Central Projects tab, click Create blank project. Enter a name for the project and click OK. A new Leapfrog Geo project will be created and saved in the location on your local drive specified in the Settings > Central window.
Work in the project as you would any other Leapfrog Geo project. When you are ready to publish the project to Central, click on the Central button in the lower left-hand corner of the screen and select Publish:
Adding a Project to Central
Use this option to add an existing project to Central.
Open the project you wish to import, then in the Central Projects tab, click Import open project. Enter a new name for the project, if you wish, then click OK. The project will be opened and copied to the location on your local drive specified in the Settings > Central window.
Work in the project as you would any other Leapfrog Geo project. When you are ready to publish the project to Central, click on the Central button in the lower left-hand corner of the screen and select Publish.
Troubleshooting Connectivity Issues
Leapfrog Start checks to see if your network will support the connection of Leapfrog web-based services to your desktop applications. If you are having trouble with your connection to Central, see Checking Connectivity with Leapfrog Start.
Got a question? Visit the My Leapfrog forums at https://forum.leapfrog3d.com/c/open-forum or technical support at http://www.leapfrog3d.com/contact/support