Combined Models
This topic describes creating and working with combined models. It is divided into:
- Creating a Combined Model
- The Combined Model in the Project Tree
- Editing a Combined Model
- Displaying a Combined Model
- Creating a Static Copy of a Combined Model
- Combined Model Export
A combined model uses information from up to four geological models, interpolants and distance functions in order to visualise relationships between different types of data in the project. For example, you could combine a geological model with an interpolant to see what lithologies higher grades are occurring in.
Creating a Combined Model
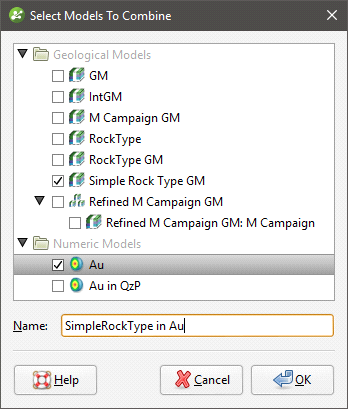
To create a combined model, right-click on the Combined Models folder in the project tree and select New Combined Model. In the window that appears, select the models you wish to combine, then click OK:
Once you have created a combined model, you cannot edit it to add new models or remove existing ones.
The next step is to select the output volumes to use in the combined model and arrange them in order of priority. For this combined model, the QzP volume from the selected geological model will be subdivided using information from the Au interpolant:
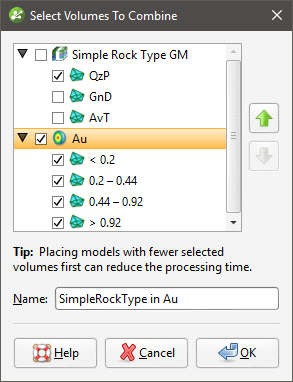
If you are using a distance buffer with concentric buffers, you will be able to select only one volume.
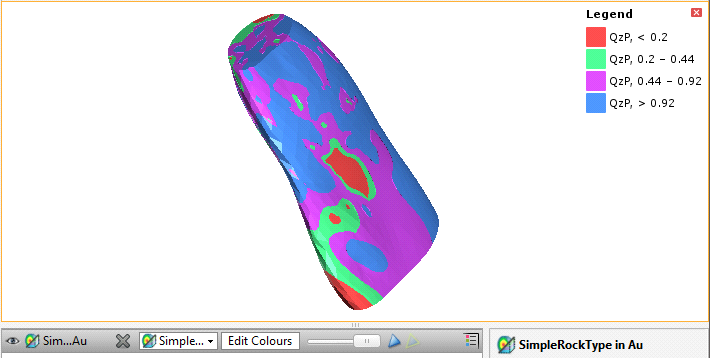
Click OK to generate the model, which will appear in the project tree in the Combined Models folder.
Add the model to the scene to view the results:
The Combined Model in the Project Tree
In the project tree, the combined model includes hyperlinks to the models used to create the combined model:
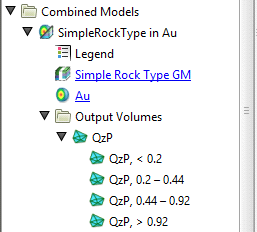
Changes made in the original models will be reflected in the combined model.
Editing a Combined Model
To change how the volumes from the source models are combined, double-click on the combined model in the project tree. Once you have created a combined model, you cannot add new models to it, nor can you remove a selected model.
Displaying a Combined Model
To change the colours used to display the model, double-click on the Legend object (![]() ). In the window that appears, click on the colour chip for each category and change it as described in Single Colour Display.
). In the window that appears, click on the colour chip for each category and change it as described in Single Colour Display.
To set multiple categories to a single colour, use the Shift and Ctrl keys to select the colour chips you wish to change, then click on one of the colour chips. The colour changes you make will be made to all selected categories.
Creating a Static Copy of a Combined Model
Creating a static copy preserves a snapshot of a combined model that does not change, even when changes are made to the data on which the original model was dependent. This is a useful way of storing historical models and comparing models. Static copies can be exported from Leapfrog Geo, as described in Combined Model Export below.
To create a static copy of a combined model, right-click on it in the project tree and select Static Copy. Enter a name for the copy of the model and click OK. The copy will be added to the Combined Models folder.
The static copy (![]() ) is made up of a Legend object (
) is made up of a Legend object (![]() ) and the output volumes (
) and the output volumes (![]() ).
).
Static models created in versions of Leapfrog Geo before 2.2 copied only the output volumes and the legend, and the static model appeared in the shape list only as a single line. When these static models are upgraded and displayed in the scene, the individual output volumes will be added to the shape list.
To view the date a static copy was created, right-click on it in the project tree and select Properties. The date the copy was created is in the General tab.
Combined Model Export
There are two options for exporting a combined model’s output volumes. These are:
- Export an output volume as a mesh. Right-click on it in the project tree and click Export. You will be prompted for a file name and location. See Exporting a Single Mesh.
- Export multiple output volumes. Right-click on the combined model in the project tree and select Export. See Exporting Multiple Meshes from Models.
Got a question? Visit the My Leapfrog forums at https://forum.leapfrog3d.com/c/open-forum or technical support at http://www.leapfrog3d.com/contact/support