Visualising Issues with Imported Meshes
Meshes imported into Leapfrog Geo may exhibit geometries that cannot be used computationally by Leapfrog Geo. For example, problems arise when a mesh has holes, self-intersections or is non-manifold, and such meshes need to be fixed before they can be used in Leapfrog Geo. Leapfrog Geo provides some tools that may fix some meshes, but blindly utilising them can result in undesirable side effects, so it is best to have a good understanding of the precise nature of the problems prior to selecting and utilising any repair options. Alternatively, understanding the location and nature of the problem may permit manual intervention in the tool generating the mesh that is being imported to Leapfrog Geo. This topic describes how to identify issues in imported meshes. It is divided into:
- Examining Mesh Properties
- Visualising Self Intersections
- Visualising Borders
- Options for Handling Mesh Issues
Examining Mesh Properties
After importing a mesh, right click on it in the project tree and select Properties. Information in the General tab can give some insight into any problems with the mesh. These are the Properties window for an open mesh (left) and a closed one:
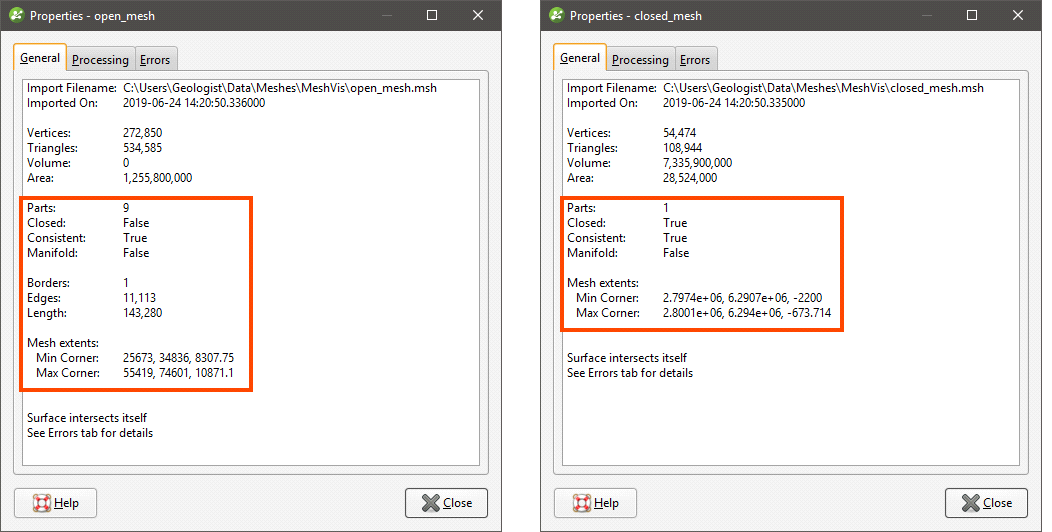
The Closed, Consistent and Manifold properties are shown for all meshes:
- A “closed” mesh is one for which no borders have been detected.
- A mesh is regarded as “consistent” when its inside can be distinguished from its outside.
- A manifold mesh is a closed mesh for which Leapfrog Geo can calculate a volume. If there are issues with parts of the mesh and the volume cannot be calculated, the mesh will be flagged as “non-manifold”, which, in Leapfrog Geo, is a general term for geometry issues that limit a mesh’s use.
Information about Borders, Edges and Length is shown for open meshes:
- “Borders” are boundary edges that are not connected to another triangle.
- “Edges” indicates the number of triangle edges that make up the border.
- “Length” is the total length of all border edges.
When Leapfrog Geo detects errors in the mesh, additional information is provided in an Errors tab.
Visualising Self Intersections
A mesh with self-intersections is often regarded as open, which limits the mesh’s use in Leapfrog Geo. The Errors tab in the Properties window provides a full list of each self-intersection triangle, but this is not useful for visualising where the self-intersections occur. There are three options for visualising self-intersections, which can be used alone or together.
The first option is to add the mesh to the scene and display it by its self intersections, which is one of the colouring options available in the shape list:
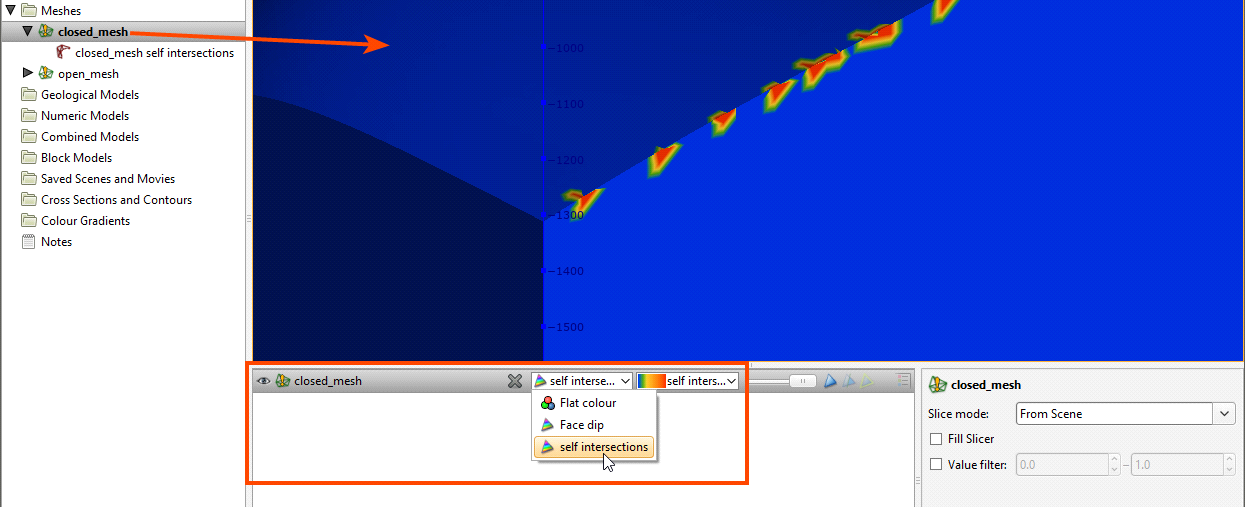
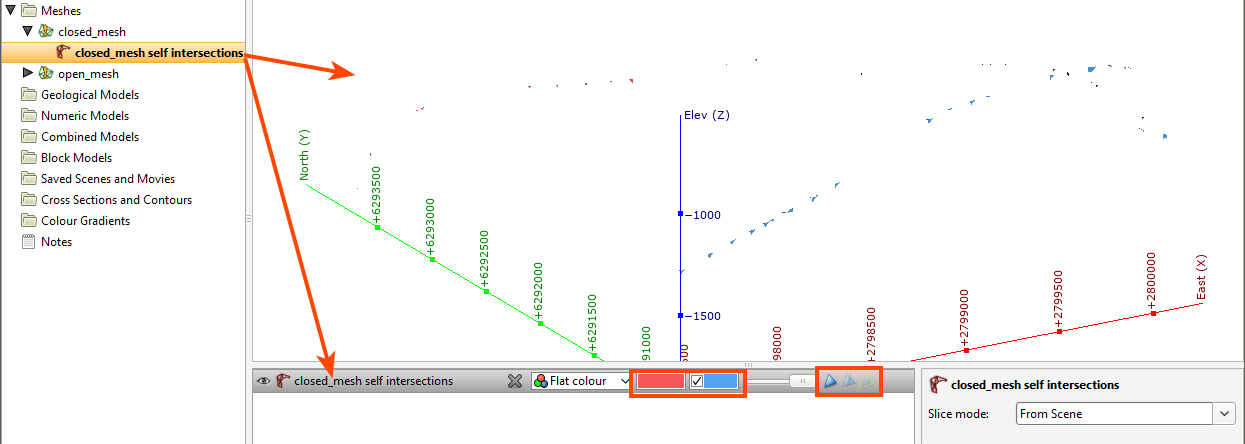
The self intersections may be so tiny that visualising them in this way is not useful. You could then use the second option for displaying self-intersections with the self intersections object in the project tree:
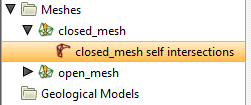
The self intersections object is a sub-mesh that replicates the parts of its parent mesh that have the problematic self-intersections. Its like a copy of the mesh with the valid parts filtered out, and it can be displayed in the scene in the same manner as other meshes. Remove the whole mesh from the scene and add only the self intersections object:
Make sure Show faces (![]() ) is on and Smooth faces (
) is on and Smooth faces (![]() ) is off. Pick front and back face shading colours that contrast with your chosen background colour, pale shades on dark backgrounds, dark shades on pale backgrounds.
) is off. Pick front and back face shading colours that contrast with your chosen background colour, pale shades on dark backgrounds, dark shades on pale backgrounds.
The problematic triangles can be invisibly small. Pressing the Home button and zooming in to fill the screen can work well if triangles are few and close together.
Use the scroll wheel to quickly zoom in and out, and click-and-drag the left-and-right mouse buttons to pan.
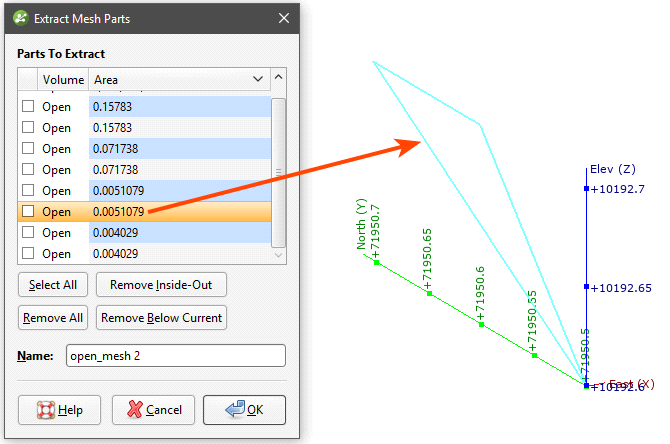
If, however, the self intersections are spaced at opposite ends of the original mesh, you probably still won’t be able to see them, in which case, the third option for displaying self intersections may be useful. This involves using the Extract Mesh Parts window to view different parts of the mesh. To do this, clear the scene. Next, right-click on the mesh (not on its self intersections) and select Extract Mesh Parts:
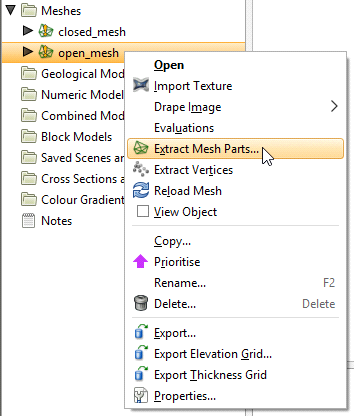
In the window that appears, you can sort the mesh parts by their volume and view only the smaller volumes, those likely to be the self intersections, one by one:
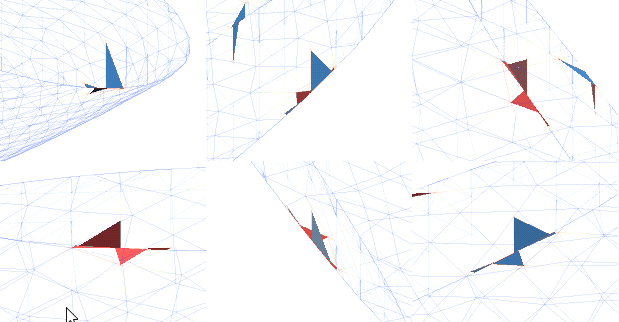
Once you’ve identified the areas of interest, add the whole mesh to the scene. Because you will have the mesh itself and its self intersections displayed, you can independently control the visibility of each. On the whole mesh, change the colouring selector to self intersections and the mesh will show hot colours where the mesh is intersected. Try turning Show faces (![]() ) off but Show edges (
) off but Show edges (![]() ) on to see just the wireframe of the mesh. You can also adjust the opacity of the mesh to make the whole mesh into a pale background so that the self intersection mesh stands out. To get a better picture of the geometry of the mesh around the self-intersecting triangles, move the scene around to see the shape better in 3D. Click the middle mouse button (scroll wheel button) on a self-intersecting triangle to set the centre of rotation on that triangle. Then click-and-drag the scene up and down and left and right and around to orbit around the point of interest. This will help you visualise the context better.
) on to see just the wireframe of the mesh. You can also adjust the opacity of the mesh to make the whole mesh into a pale background so that the self intersection mesh stands out. To get a better picture of the geometry of the mesh around the self-intersecting triangles, move the scene around to see the shape better in 3D. Click the middle mouse button (scroll wheel button) on a self-intersecting triangle to set the centre of rotation on that triangle. Then click-and-drag the scene up and down and left and right and around to orbit around the point of interest. This will help you visualise the context better.
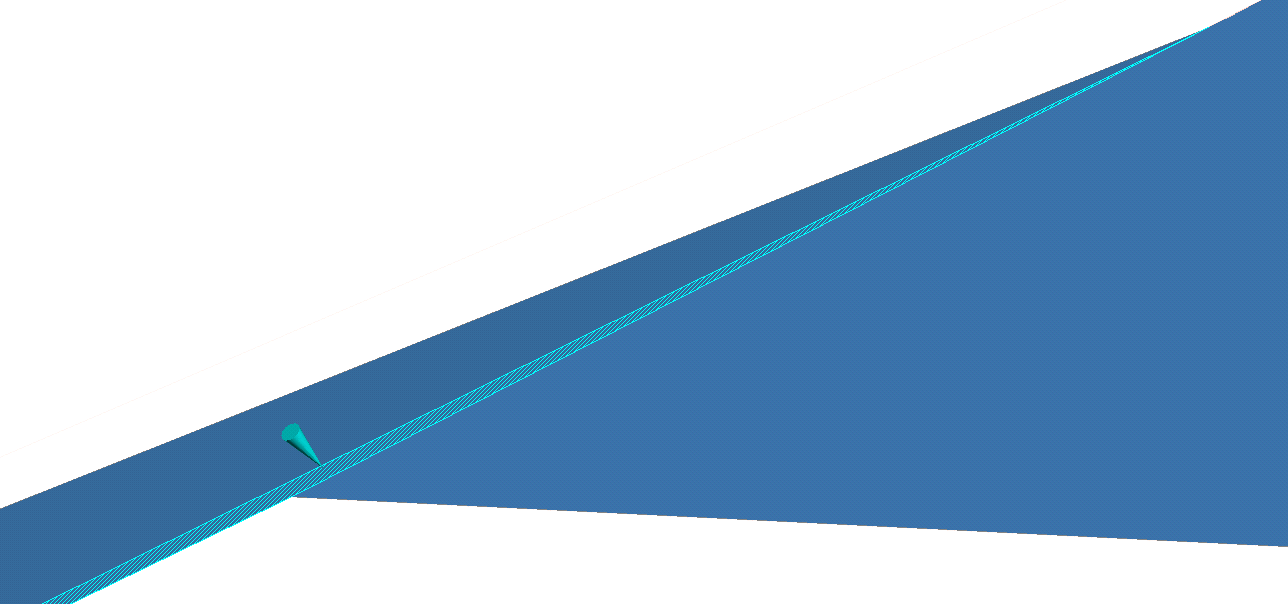
The self-intersecting triangles can at times look very simple, but zooming in very close to the corners, edges and contacts between triangles may reveal some very small triangles you hadn’t previously noticed.
The Cleanup Mesh window has a Remove self-intersections for volumes option that can be useful in fixing some self intersections:
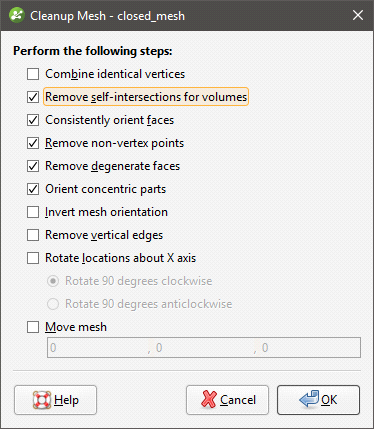
The Cleanup Mesh window can be opened by double-clicking on an imported mesh in the project tree. See Cleaning Up a Mesh for more information.
The Remove self-intersections for volumes repair option retriangulates self-intersecting triangles and trims away remaining open surfaces, whether they lie inside or outside the mesh.
- Before applying the Remove self-intersections for volumes option, check whether the mesh is open or closed. A mesh may appear to be closed in the scene but the Closed property will be false. Such a mesh may be made up of open parts that do not join up perfectly to make a closed mesh. If Remove self-intersections for volumes is enabled for such a mesh, it may disappear when it is trimmed.
- Remove self-intersections for volumes should not be enabled for surface-like open meshes. You may wish to enable Remove self-intersections for volumes if a mesh is reporting as open but is more volume-like than surface-like. Such a mesh may have a single open part that needs to be removed, or it may have open parts that line up perfectly and can be retriangulated to form a closed mesh.
If you enable this option, check the resulting mesh’s properties and that is appears in the scene as you expect.
Visualising Borders
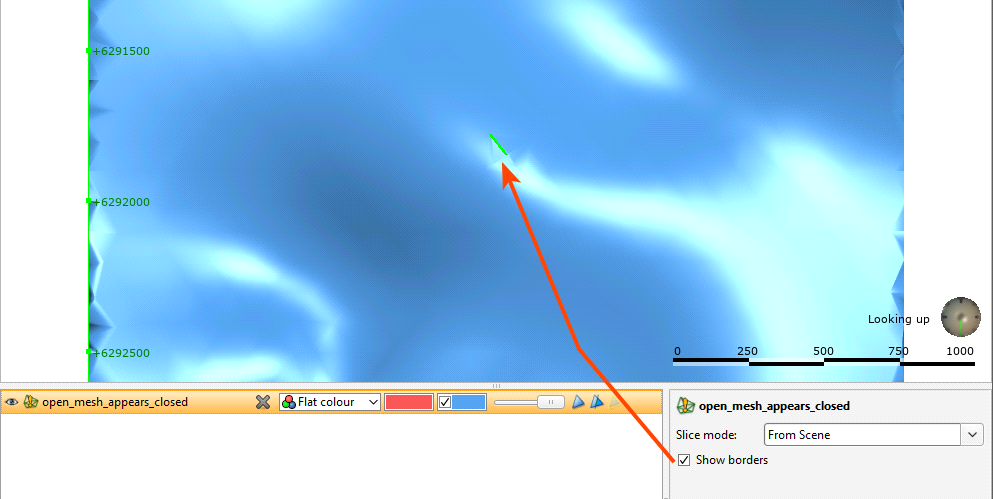
Leapfrog Geo may regard a mesh as open when it appears to be closed. Here a mesh that appears to be a closed volume is displayed in the scene:
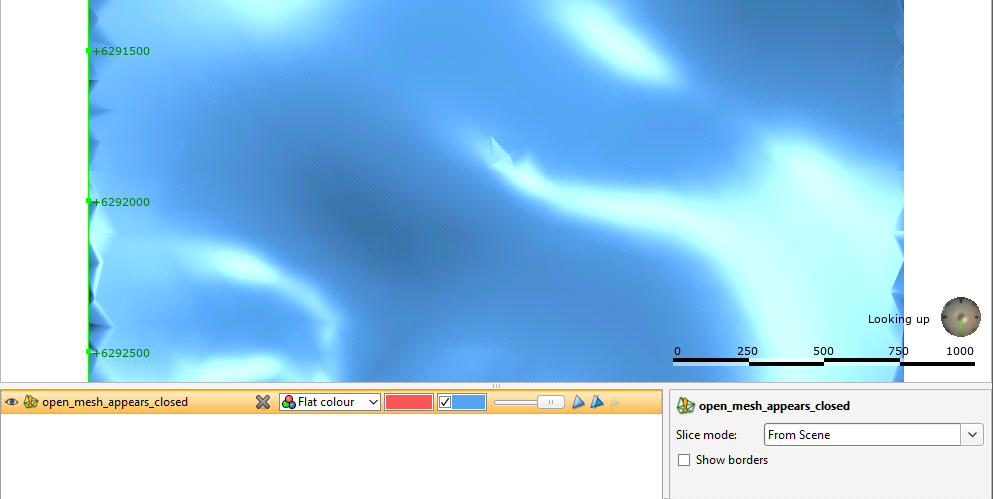
To visualise where the borders are on the mesh, enable the Show borders option in the properties panel. In this example, a small border can be identified:
Options for Handling Mesh Issues
Key questions to ask with regard to mesh issues are:
- Can the mesh be fixed in the application of origin?
- Do you need to use the affected part of the mesh?
- Can you extract the parts of the mesh you need to work with?
The best option for issues with an imported mesh is to fix the issues in the application of origin, and diagnosing the issues in Leapfrog can be of some help in doing so. But when fixing the mesh outside Leapfrog Geo is not possible, there are mesh repair options available through the Cleanup Mesh window. This is opened when meshes are imported, but you can also open it by double-clicking on a mesh:

However, some options can have unexpected results and so it is best to have a good understanding of the precise nature of the problems prior to selecting and utilising any repair options. The Cleanup Mesh window can be opened by double-clicking on an imported mesh in the project tree. See Cleaning Up a Mesh for more information.
When these mesh repair options cannot fix the problems, consider whether you need to use the problem part of the mesh. It could be that the issues you have identified lie outside the are in which you are modelling. If Leapfrog Geo does not limit the use of this mesh in your model, using the mesh might not be an issue.
If you do not need to use the problem part of the mesh but Leapfrog Geo limits your use of the mesh due to the errors identified, you could use the Extract Mesh Parts tool to extract the parts of the mesh you want to work with, leaving out the the parts that have issues.
If you cannot resolve issues with a mesh, contact support as described in Getting Support. When doing so:
- Include a zipped copy of the project that includes the mesh.
- Identify the source of the mesh.
Got a question? Visit the Seequent forums or Seequent support